
2D animation
What Is 2D Animation?
Often thought of as traditional animation, 2D animation mostly works with vector graphics through computer software, to create animated images that could be used in advertisements, websites, films, or computer games.
The 2D animation process involves the creation of characters, storyboards, and backgrounds in two-dimensional space. Objects in 2D animation move up, down, left and right, but they don’t move towards or away from the camera, like in 3D animation.
Most popular 2D animation software include Adobe Animate, Photoshop, and After Effects.
What are the parts of 2D animation production pipeline?
2D animation is divided into three parts: pre-production, production, and post-production.
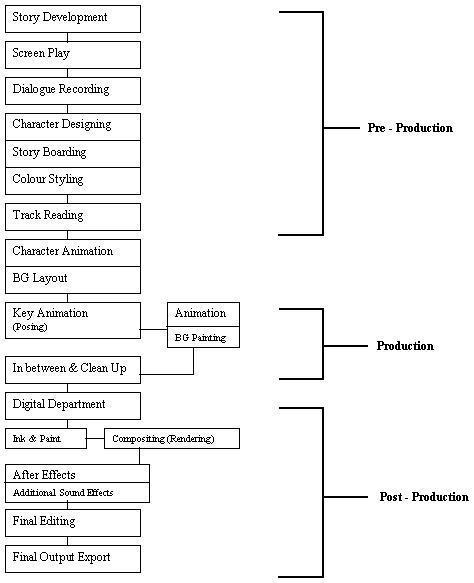
First: the pre-production phase
Script
Writing down the script is the first and most important stage of any type of film production. It plots the storyline, the shooting directions, and the dialogue.
In animation, the script focuses more on directing the visual actions, while more attention is given to the dialogue in live-action films.
Storyboard
The storyboard is a graphic visualization of the course of actions and events across the animation. It gives a solid representation of the animation, allowing the director to asses the script and apply the necessary enhancements at this stage.
This is useful in animation, since applying edits during later production stages can get harder and more expensive. A storyboard is basically a sketch of how to organize a story and a list of its contents in a way that resembles a comic strip.
Dialogue recording
Dialogue recording involves having the voice actors read lines from the script, as well recording additional sound effects. It’s then passed to the animators to draw proper mouth movements that appropriately match each spoken word. Proper voice acting plays a great role in making an effective animation.
Character designing
This process includes producing model sheets for each element of the animation, including characters, props and backgrounds, and any sort of extra visual effect.
Each model sheet is mainly made up of the final design with its proportions, and drawings of the main different poses that a character is likely to execute during the animation. These sheets serve as a standard reference throughout the animation process, to preserve a consistent look and feel for each character.
They are very effective in large scale teams, where different animators may work on the same character at different stages of the process. When followed accordingly, the character will seem to be dawn by one animator. A character that is not drawn according to its standard sheet model is called an off-model.
Example of a Model sheet:

Look and feel (color scripts)
The color palettes are designed for each character in the animation, and also the colors of different objects, major locations and backgrounds are defined. The art department also sets the various colors for lighting across the animation.
Track reading
Track reading is an old technique, dating back to the late 1920s, that analyzes the sound frame by frame. The dialogue tracks used to be transferred to an optical or a magnetic sound film, with holes that exactly match those of motion picture film. This allowed for both the image and sound to be mechanically locked together to be exported for editing on sound mixing machines.
A device called gang synchronizer was used to precisely indicate individual components of the track. It consisted of a large sprocketted wheel which helped set up relationships between the film and the soundtrack that was recorded to a film.
The sound film is driven by hand back and forth over a magnetic pick-up head until each part of a word can be identified. This process is called 'track reading'. The dialogue track is analyzed, and the information is charted up onto camera exposure sheets, sometimes called 'dope sheets' or 'camera charts', as a guide for the animator.
Modern computer software, like Audacity or SoundEdit16 have made it easier to accurately analyze dialogue. They allow the editor to scrub back and forth across the audio file with a visual depiction of a sound wave.

Dragonframe
Dragonframe is a stop-motion animation software. It has been used to make several full-length motion picture films, including Disney's Frankenweenie.
BG layout
Background layouts consist of line drawings that outline the different backgrounds of a scene, before painting them with colors seen on the screen.
The layouts are derived from the rough background sketches, provided in the storyboards that were created in earlier stages of the pre-production process.
They mainly serve as a guideline for painters, so they can work on colorizing the backgrounds, and these lines can remain visible in final production, depending on the style of the animation.
Backgrounds play an important role in setting the overall mood of the scene, and a good designer will know how to craft backgrounds that correspond to the different settings and actions throughout the animation.


Second: production phase
Key animation
First: background painting
After finishing the background layout process, they are forwarded to a background painter. He paints the layouts according to the color palettes specified earlier by the color stylists in the pre-production phase. The finished backgrounds are then forwarded to the scene setup or compositing team.
Here’s some digital background painting done by Golden Street Animation.
Second: animation
The animators start creating the actual scenes that make up the animation film, by acting out the different poses and situation that a character assumes in each scene. They combine the model sheets, storyboard, layout and backgrounds defined in earlier processes to produce scenes that put all these elements together in harmony.
Timing on animation is based on the exposure sheet, which is sometimes referred to as camera instruction sheet. It’s a traditional animation tool that allows the animator to provide clear instructions to the cameraman on how each scene is to be shot.
The exposure sheet is also used to lip sync the vocals, by scrubbing the audio and specifying exactly where each vowel sound happens on the sheet. Another advantage of x-sheet is that it works great in large teams, since it provides a comprehensive map of the animation that others can follow.
An exposure sheet consists of five sections or columns, and is a bit longer and narrower, than A4. Every eighth line down is marked thicker than the rest and shows half a foot of film. One second of animation would take three of these sections. Sound breakdown was often done on separate sheets called bar sheets made by the editor, and given to the animator who would transpose them to his dope sheet.
These columns divided to:
- Action
This column holds the timing planned out for the scene, how long the scene should take; and also the action of the character, at what point would the character have a particular pose. Some animators also annotate the key and breakdown poses within this column to make the action clearer.
- Dial
The dial holds the breakdown of the pre-recorded dialogue (or the beats of the music in case of no dialogue) to know at which frame to hit a certain phoneme.
- Cel Levels
There are generally five of those columns, each representing one layer of cel, meaning to say one x-sheet can hold up to 5 layers of animation, although these many are never usually required.
- Background
This column has the background numbers and for how long to hold one and when to switch to another.
- Camera
The commands for the camera are put down in this column. If you want the camera to pan, or zoom in or just shake, all of that goes in here.

There is a written explanation on how to use the exposure sheet:
Let's say you're doing a basic action analysis exercise.
Use the Ex-Sheet from the very beginning of your scene. Say you time it out to be roughly 9 seconds long: the character enters scene struggling with a heavy suitcase, puts the suitcase down and collapses in a chair and settles to a final, resting pose, exhausted. The scene may expand or contract a bit as you get into it adjusting the timing, but for now assume you're going to do this action in 9 seconds. Fill out your ex-sheets from start frame to finish frame, on twos (that is on the odd numbers, 1, 3, 5, 7, 9, 11, 13, 15, etc.) so you assume you will be animating on twos , but the ex-sheet will have blank spaces left open on every other frame line to add ones (1, 2, 3, 4, 5, 6, 7, 8, etc.) if needed in certain sections of the scene. Ideally you would use a stopwatch to time yourself acting out the scene: struggling with the heavy suitcase, set it down, collapse into the chair and settle. As you get a feeling for how long it takes you to do these actions (say 3 seconds to enter, 4 seconds to set down the suitcase and anticipate sitting down in the chair, 2 seconds to complete the action of sitting down and settle into the end pose) you should jot it down in the "Action" column of the Ex-sheet, making notes to yourself about what will be happening, maybe even doing quick little thumbnail drawings of the action. You should also be making small "thumbnail sketches" of what the character will be doing, attitudes, poses, etc. to work out ahead of time how you expect to draw it. The thumbnails are quick, rough drawings, worked small on purpose to keep you from putting in too much detail. These are planning, exploratory drawings to help you visualize how you're going to draw it in the final version. Again, these thumbnails could be drawn on the margins of the Ex-sheet in the "Action" column or on a separate sheet of paper, however you prefer to work. By pre-planning like this you should have a rough idea of where certain key poses will hit, so you know that you likely have Key poses at frame 11, frame 35, frame 71, frame 113, and so forth. Lightly circle those numbers on the ex-sheet, so you have a visual benchmark of where your Keys are going to hit. As you animate you may find that you need to adjust your timing, so a Key drawing you thought was going to hit at frame 35 actually ends up hitting on frame 39, and you will adjust the numbering on the drawings and the Ex-sheet. This is a good reason to use a light touch when first numbering your drawings and ex-sheet, so if you have to change the numbering a lot later on you won't have to spend a lot of effort erasing the numbers, if you kept them lightly penciled to begin with. Later when you finish filling out the Ex-sheet you can bear down harder on the pencil so the numbering is very neat and clear.

Pencil test
After all the drawings are cleaned-up, they are then photographed on an animation camera, usually on black and white film stock. Nowadays, pencil tests can be made using a video camera and computer software.
Example:
In between and clean up
When your rough animation is ready, it is time to clean it up and ink it. The clean-up is also called tracing. It consists of tracing solid and clean lines over the rough animation to get closed zones. This is the final paperless animation step before the ink and paint step.
You will need to add a new drawing layer to create your cleaned-up drawing. This is the equivalent of adding a sheet of paper and tracing the rough using the animation disk.
Tracing in a new layer
If you plan on tracing your animation in the Drawing view, enable the light table to display all the layers in your project.
This method allows you to keep the roughs and the cleans intact. You only need to disable the rough layer to prevent it from appearing in the scene.

Tracing directly over
Tracing or cleaning directly over means to clean your drawing in the same cell. This method avoids adding too many layers to your scene or demanding too much power from a low performance graphics card when using the light table or onion skinning. However, the rough animation has to be removed.
This technique is the equivalent of sketching on paper with a blue animator pencil and then inking directly onto it in black. Harmony allows you to select all the zones using a certain color from your palette. Then you can trace over your sketch with a different color. Once you are done, you can select all the zones painted with the sketch color and delete them, keeping only the clean drawing.

Inbetweening
Inbetweening or tweening is the process of generating intermediate frames between two images to give the appearance that the first image evolves smoothly into the second image. Inbetweens are the drawings between the key frames which help to create the illusion of motion. Inbetweening is a key process in all types of animation, including computer animation. These inbetweens are what makes the animation look fluid.
If you are making an animation about a man walking, you would probably have the following frames:
- Man standing straight as initial key frame
- The man is now shown slightly lifting his right leg
- The leg is now half way to a full bend
- The leg is now fully bent
- The leg is starting to unbend forward
- And so on
Until you get to the final key frame of the step which is a full stride.
Without the inbetweens the animation would look so jugged and jittery. It helps just to have the key frames of the beginning and end of the motion as this gives the animator a very good idea of how the frames in between should look like.
Digital Department
Ink and Paint
The current process, termed “digital ink and paint”, is the same as traditional ink and paint until after the animation drawings are completed; instead of being transferred to cels, the animators’ drawings are either scanned into a computer or drawn directly onto a computer monitor, where they are colored and processed using one or more of a variety of software packages. The resulting drawings are composited in the computer over their respective backgrounds, which have also been scanned into the computer (if not digitally painted), and the computer outputs the final film by either exporting a digital video file, using a video cassette recorder, or printing to film using a high-resolution output device.
Compositing
The compositor imports the colored background, the animatic reference and the sound as required. Referring to the exposure sheet, the animatic and the animation, the compositor assembles all of these elements and create the camera moves and other necessary motions. Finally, the compositor adds any digital effects required by the scene. These can include tones, highlights and shadows. When the compositing is finished, the final step is rendering.
Compositing is the combining of visual elements from separate sources into single images, often to create the illusion that all those elements are parts of the same scene. Live-action shooting for compositing is variously called "chroma key", "blue screen", "green screen" and other names. Today, most, though not all, compositing is achieved through digital image manipulation.
Basic procedure
All compositing involves the replacement of selected parts of an image with other material, usually, but not always, from another image. In the digital method of compositing, software commands designate a narrowly defined color as the part of an image to be replaced. Then the software replaces every pixel within the designated color range with a pixel from another image, aligned to appear as part of the original.
Export
Once the compositing is completed, the final step is to render the scene as a movie or an image sequence. Generally, the compositor will be the same person to do the rendering.
Post-Production
Additional sound effect
A musical score is an original music written specifically to accompany a film. The score forms part of the film’s soundtrack, which also usually includes dialogue and sound effects, and comprises a number of orchestral, instrumental or choral pieces called cues which are timed to begin and end at specific points during the film in order to enhance the dramatic narrative and the emotional impact of the scene in question.
Sound effects or audio effects are artificially created or enhanced sounds, or sound processes used to emphasize artistic or other content or films, television shows, live performance, animation, video games, music, or other media.
Final Editing
Editing is choosing segments of the animation production footage, sound effects and sound recordings in the post-production process that will be in the final output.
Final output export
This will be the final format of the video, whether DVD, Blu-ray or maybe just Video File. You will just prepare the file and render it according to the needs of the distributor.
In principle, the role of Animator is the same for all techniques of animation; the differences are in the tools used and in some of the skills required. Most professional 2D computer animation work in the UK is produced on one of two packages, either Flash or CelAction. The animation process can differ for both programmes.
In addition, different studios set up production in different ways, with animators taking on various responsibilities beyond just animation.
In CelAction, good draughtsman ship is not always needed from Animators because all the elements will be provided in a comprehensive design pack which can contain not only designs, but also layouts, storyboard and soundtrack. From this material, Animators create the action, developing character and performance; a process comparable to a model animator being given a puppet or model to animate.
Flash is more of a universal tool and Animators can find themselves doing a bit of everything. Design and drawing skills are more likely to be required because, depending on the project, Animators may be working from rough storyboards or producing their own layouts, sometimes as drawn artwork to be scanned in to the computer.
In addition to creating the animated movement and performance, Animators are responsible for the consistent design and line quality of their animation. On some projects, Animators may be expected to be involved in the digital compositing and editing stages.
Animators may develop skills and preferences for different aspects of animation, such as special effects or lip sync, and consequently find they work mainly in those areas.
Choosing the Best 2D Animation Software:
2D animation software is a fun way to bring scenes from your imagination to life, and you want to buy a program that fits your needs and experience level. Since each animation software has a unique set of features and tools, you need to consider your options as you shop around. Take into consideration what you want your result to be, for example whether it’s feature length or short films, ad banners, presentations or motion comics. Once you figure out what to animate, you need to decide how you want to create your animations. The best 2D animation software provides you with the tools to be as creative as you want as efficiently as possible.
Software
Adobe Animate (Formerly known as Flash)
Probably the most popular 2D animation software out there. Animate has a long lineage of animation making, dating back to the early days of internet video publishing. It is vector based, very intuitive to use (as are most of Adobe’s programs) and relatively inexpensive. It’s great for getting started with 2D animation, and though it’s not meant for professional animation production (unlike Toon Boom Harmony) you can still get amazing results with it.
Adobe After Effects
An interesting choice for 2D animation. After effects gives you great control when creating rigs for 2D, and using the puppet tool is very convenient and intuitive. I find it to be a great choice if you’re already comfortable with the Adobe environment, but that’s a matter of preference. Since it’s an editing software it’s great to be able to edit and color correct in the same place you animate, and while it’s not the traditional way the pipeline works, it could save some time.
Best Beginner Software
Anime Studio offers both beginner and pro animation programs. The beginner program has a collection of tools that are tailored to novice animators. It covers the basics and gives you what you need to build a foundation in the art of animation.
The professional program gives you all the tools that the beginner version has plus additional advanced features to create more complex animations. Some features in the beginner version have limitations that the pro version doesn’t. For instance, there is a two-minute limit on the animation length in the beginner version, but the animation length is unlimited in the pro version. Both are affordable based on the features they offer. If you are not sure how far you want to go with animation, many companies offer the option to upgrade if you outgrow the beginner software.
Anime Studio
Smith Micro Software makes beginner and professional versions of its Anime Studio 2D animation software, Anime Studio Debut and Anime Studio Pro, to help you bring your imagination to life. Its programs have libraries of premade characters and assets you can use to quickly create and populate scenes. This cartoon maker software also includes a character wizard that uses preset character features you can mix and match and adjust. In addition, both versions have tools you can use to draw your characters on your computer like freehand drawing tools, brushes and vector conversion so you can trace imported sketches. In addition, both versions are compatible with drawing tablets.
These animation maker programs use a bone-rigging system to help realistically animate your characters. This feature helps best use the animation software to control how your character moves, bends and turns, and it smooths any distortion around the joints.
Once you have your characters rigged, it’s easy to make them perform complex movements, which in turn makes your animation look professional. Only the professional version of this program includes an onion skinning tool. Onion skinning is a traditional animation method that allows you to see the frames before and after the one you are currently working on, which helps you create smooth movements and transitions.
You can use both versions of Anime Studio to record dialogue and sound effects directly in the program, and you can use the software to edit the audio as well. Most 2D animation software edits sound, but few have the ability to actually record audio. There is also an automated lip-syncing tool that detects the phonemes of your voice and maps them out with mouth poses for your drawings.
This program does not include any premade environmental effects such as rain, smoke, fire or explosions. You either have to create these effects yourself or purchase them from members of Anime Studio’s active user community.
The company’s programs allow you to import images in a wide variety of file types, including JPEG, PNG and BMP. When you are finished with your cartoons, you can export them as an AVI, QuickTime and Flash Movie files or upload them directly to the internet.
Toon Boom
Toon Boom’s animation software gives you a lot of control over your 2D animation projects. With the program, you can choose from five different animation techniques: traditional paper animation, digital animation, cut-out and puppet animation, rotoscoping, and stop-motion. You can also mix these together for some interesting effects.
The program’s bone-rigging feature makes your character’s movement look natural, though you can choose to make his or her unnatural as well. The onion skinning feature helps you control the movement and the timing of each animation by showing you your previous drawing underneath your next sketch – this helps create smooth motion. There are also animation pegs to chart the path of the character’s movement. The software automatically animates the steps between two points using either frame-by-frame or keyframe animation.
In addition, you can import dialogue or sound effects into your project, then edit them in the program. The lip-sync function automatically synchronizes your dialogue with your characters’ mouths. You can also control your finished product with a set of camera tools, which let you adjust the camera angles and follow subjects with the camera as you animate.
Some artists believe the best way to use animation software is with a drawing tablet, and you can use one along with Toon Boom software to draw and color directly in the program. If you prefer, you can sketch right in this software using your computer mouse or import digital images and drawings. The program also comes with several special effects, including flames, rain, smoke and camera shake.
Toon Boom Harmony has many import and export options. You can upload your own paper drawings or digital images as more than 13 different file types. You can also export single cells and frames or whole projects in a variety of ways. These include exporting AVI video files for television playback and uploading directly to websites such as YouTube and Facebook.
FlipBook
Digicel’s Flipbook cartoon maker software uses time-honored animation methods to create your animation masterpieces and is designed with the traditional animation artist in mind. It doesn’t have character libraries and templates like other digital 2D animation software, so you have to draw everything yourself. Still, FlipBook has the professional tools you need to create high-quality animations. This animation program provides one foreground layer and background layer and can hold up to 300 frames.
The pencil tool has an adjustable stroke size so you can choose the thickness of the lines you draw. In addition, with the bounding box tool, you can create square and rectangle shapes as well as designate areas you wish to fill or erase. You can use any TWAIN scanner to directly import your paper and pencil sketches into the program, and you can also import pictures in JPEG, PNG and BMP formats for use in your project.
If you plan to draw your characters in the program rather than scan in images, a drawing tablet is one of the best ways to use animation software. FlipBook is fully compatible with Wacom brand and most other tablets. This animation maker recognizes pencil pressure when using a tablet. Its responsiveness helps maintain accuracy, so drawings on the screen look just like they do on your sketchpad. This animation software does not use vector-based images, so you cannot convert any of your drawings to vector graphics.
With Flipbook, you can use onion skinning, an animation technique that allows you to see the frame you are currently working over the previous and next frame. Seeing the position of your character in the previous frame helps you make movements natural and realistic. This software does not use a bone-rigging system, and there is no option to create animation paths.
Support is available but limited for this animation software. The program comes with a help file that walks you through the program’s tools and procedures. If you need additional help, the Flipbook homepage has a support section with an email address and a few video tutorials. You can also call customer support if you prefer to talk to a representative.
DrawPlus
DrawPlus by Serif is drawing, illustrating and 2D animation software that allows you to create animation masterpieces using a single program. This animation software is full of tools you can use to create high-quality backgrounds, scenery and characters. It includes drawing tools, complete with pencils, erasers, shapes and vector path pens. You can also scan your paper drawings and trace over them to convert them into vector graphics for coloring and animating.
A joint tool places movement points on your character's body so it moves naturally and smoothly. You can animate using individual frames or create animation paths with keyframes. In addition, the program supports onion skinning, which allows you to see the previous frame, your current frame and the following frame on top of each other to help you create smooth movement.
DrawPlus is compatible with drawing tablets, and the integrated Pressure Studio application helps you calibrate your tablet for optimal results when using the program. Drawing tablets are a comfortable way to create digital art, as they allow you to sketch naturally.
You cannot use this 2D animation software to record or edit dialogue and sounds. While you can import sounds into your animation, you have to use a different program for audio recording and editing. It also doesn’t have a special effects library or a lip-syncing feature.
DrawPlus supports a wide variety of file types, including JPEG, GIF, PNG and BMP image files. You can also import video files that are in AVI or QuickTime formats. If you want to add audio to your show, you can import MP3 or WAV files. When you finish your project, you can export your animation as a Flash or AVI file or a QuickTime movie.
If you ever have any questions about this software, you can find answers in the FAQs, user forum or knowledgebase support pages on the Serif website. Also, there are a few text and video tutorials that give step-by-step instructions on animating with keyframes and stopframes. If you still can't find the answer you need, you can contact Serif by phone or email to speak directly to a technical support agent.
The TAB
One of the biggest drawbacks to animation is the time it takes to create each individual drawing. With 2D animation software, you can reduce the amount of time you spend with each frame because the computer can automatically create the inbetweening of your characters and objects. The TAB by Digital Video is good 2D animation software that helps you streamline your artistic workflow with its intuitive drawing tools and flexible keyframe animation. The TAB series of 2D animation software includes Student, Standard, Pro, Manga and kids programs, so you have many choices to create your animations.
The TAB cartoon maker programs have drawing tools that make it possible for you to manipulate and adjust your artwork with ease. While you can draw using your mouse, this program supports the use of electronic drawing tablets. The TAB software senses the pressure from your pencil and translates it onto your screen. This sensitivity gives your digital strokes the same look as if you were drawing on a piece of paper.
The program’s animation and sound timeline is called XSheet, and it is a format that has been used by professional animators for years. You can make simple sound edits in The TAB software, but you must create your dialogue and sound effects in another program and import them into your project. If you have complex edits to make, you need to use other software to make those changes as well.
You can import several file types into The TAB Pro and other versions of the software, and you can convert them into vector images. In addition, you can export files as SWF Flash, AVI or MOV files. This animation software can also export your animation as a sequence of images so you can review or share individual frames.
There is next to no technical or customer support for this 2D animation software. There are a few video tutorials you can find on YouTube to learn about some of the basic functions and an email address you can use to contact the customer service department, but it does not guarantee feedback if you email it. In addition, it doesn’t have any support plans you can purchase. You can find user manuals under the press section of the manufacturer’s website; the manuals do give some insight into how to use the program, but it would be nice to have tutorials or a user forum to ask other animators specific questions.
CrazyTalk Animator
If you want to try your hand at creating an animated show but don't have the artistic skills to hand draw images, CrazyTalk Animator may be the solution for you. This 2D animation software by Reallusion has tools to take your animation project from the storyboard stage to a completed show. Everything starts with your character creation, and you can select from premade body parts to create the perfect characters for your show. You can also import vector graphics.
CrazyTalk Animator uses puppeteering to control the movement of your character's limbs and facial expressions. You can bring your character to life very quickly by selecting predetermined actions and expressions from the puppeteering panels. This can save you valuable time, especially if you are an animation beginner.
One of this 2D animation software’s best features is that you can import pictures of yourself, friends, family members or pets and turn them into animated characters. Using the intuitive masking function, you can select the head and place it on a premade vector-image body. The mask removes the unwanted area around the head, making it easy to focus on animating the expressions and facial features. CrazyTalk Animator uses premade mouths with the anchor points you designate on your photo to make it look like your subject is speaking.
This cartoon maker software toes the line between 2D and 3D animation by animating characters from 10 different angles. This method gives the illusion that your 2D characters are moving around in a 3D space. By using different perspectives, you can effectively turn your characters around without revealing their 2D designs. This opens up a whole new world for animators who want to experiment with different camera angles and give their shows a dynamic feel.
CrazyTalk Animator allows you to record audio through a microphone attached to your PC, or you can import your sound and dialogue files. Adjusting the volume and fading in or fading out are the only audio-editing options included with this animation software. You need another program to alter sound and dialogue if you want to edit beyond that.
There are many premade lip-sync animations you can choose from. The text-to-speech function is another great feature. When you type in your dialogue, the program picks out the major intonations and applies the correct mouth animations for you.
Reallusion has many support options, including a comprehensive user manual, user forum, FAQs and training videos. You can reach customer service by phone or email. CrazyTalk Animator does not work with Mac computers at this time.
Puppeteering: the art or trade of a puppeteer the manipulation of a person, event and etc…
Motion Artist
Smith Micro Software's MotionArtist is designed with comic artists in mind, providing a way for them to add movement and sound to their creations. With this 2D animation software, you can import the characters and artwork you have created in other drawing programs and turn them into motion comics and movies.
MotionArtist has three workspace views, each with a different purpose and toolset. The Director View is the most commonly used workspace in the application, and it presents an overall view of your work. You can add panels in this view and arrange the layout of your page. You can also set motion paths and add stop points. Stop points are an essential part of your motion paths, as they give your viewers a chance to read your word balloons and admire your art.
Word balloons are easy to create and use in MotionArtist. You can choose from a variety of premade word balloons or create your own to your artistic style. When you are finished with your project, you can choose to export it as an AVI or QuickTime movie file. You can also export it as still frames in JPEG, PNG, BMP, Targa or PSD file formats. In addition, you can upload your animations directly to your Facebook or YouTube account to share with your friends.
While you have to create your graphics and drawings using other drawing programs, MotionArtist is compatible with most image, video and audio files. Flash SWF is one of the few file types the program doesn’t support, but it does support layered Photoshop files. With this type of file, you can edit and animate individual elements in your drawing. You can also scan in pages from an already published comic, split up the panels and add motion to them. This is a great feature for artists who already have work published but want to convert their creations to a digital format to post online.
The MotionArtist software includes a PDF manual, and the website has a series of video tutorials that walk you through the features and workspaces. If you have any questions or concerns with this 2D animation software, you can browse the knowledgebase found in the support section on the website, or you can contact Smith Micro Software by telephone or email if the available support resources don’t answer your questions.
Stopmotion Studio
Animation doesn't have to be confined to a sheet of paper or a computer screen. The stop-motion technique has been around since the early 1900s, and it is a fun way to bring objects to life. Stopmotion Studio is an easy-to-use 2D animation program that animates your photos and drawings as well as your actions figures and Lego creations.
Stop motion animation is a tried and true art form with film credits including older titles like “Star Wars” and “King Kong,” as well as modern shows such as “Robot Chicken,” “Wallace and Gromit” and “Coraline.” Using Stopmotion Studio, you can create your own shows and shorts by capturing sequential images with a web camera, digital video camera or DSLR camera.
This animation software uses frames on a storyboard to create your animation. When you use stop-motion animation, you create the illusion of movement by moving your object a little bit in each individual frame. When these pictures are played back in sequence, it looks like your object is moving.
Stopmotion Studio uses a storyboard interface for animation creation, which allows you to see all of the frames in sequence. You can also rearrange the pictures at any time by dragging and dropping them where you want them to appear in the sequence. The program has hotkeys you can use to merge, cut, delete, and copy and paste images with just a few keystrokes. You can also add intro or ending credits and onscreen text or subtitles to your video.
When you’re creating a new frame, you can take advantage of the onion skinning feature. This feature turns the previous frame into a transparent overlay to help you position your object perfectly for the next frame. The Chroma key feature makes putting a background behind your characters easy. All you have to do is take the pictures of your character in front of a blue or green screen and import your background images from another source. The Chroma key removes the blue or green screen and replaces it with your chosen background image.
Stopmotion Studio, works with BMP, JPEG, GIF and PNG file formats. The software doesn't import images directly from a scanner, but you can import then to your hard drive and then open them in the program. The software can import images from a connected camera. You can upload audio for sound effects and background music as MP3 or WAV files and record your voice for dialogue as well. Stopmotion Studio does not have tools to edit any of these sounds, so you have to make changes in a different program before importing them into the animation software.
Animation Workshop
Animation Workshop is 2D animation software with a niche focus on creating commercial advertisements such as animated web banners and buttons. Because it isn’t designed to animate stories, it does not have traditional animation features and tools to create cartoons or animate characters, you can use it to quickly create web graphics to grab the attention of your customers.
This animation maker has an easy learning curve, so you can successfully use it even if you aren’t tech savvy. The interface is straightforward, with templates for banner and buttons organized in easy-to-navigate menus. You can add or remove images, create text or backgrounds, and edit your animation frame by frame with this animation software.
One of the best features of this animation maker is its support for a wide variety of file types. You can create graphics in other programs, such as Adobe Photoshop or GIMP, and import them into your project in Animation Workshop. The software supports images in JPG, PCX, GIF, BMP, TGA and PNG formats. In addition, you can upload video in AVI, GIF, MOV, and MNG file formats as well as digital video. On the flipside, you can export your projects in GIF, MNG, AVI, MOV and SWF formats. If you decide to save your project in the SWF format, it retains the sound.
To use this program, all you have to do is add images and text and let the program do what it does best, which is create animated buttons and banners. The results can be quite impressive, but the process may be too simplistic and hands off for anyone who wants to accomplish more. This is not the best program for animators who want to control the fine details of their animated creations.
Animation Workshop has in-program support. When you select the help option, the software directs you to a webpage with several links filled with detailed articles. Alchemy Mindworks, the software’s manufacturer, has an online email form if you need to contact a representative. The manufacturer boasts an average response time of one hour during regular business hours and one day for all other times.
